How to Add Custom Fonts to WordPress
Table of Contents
Are you tired of the same old fonts on your WordPress website? Want to add a unique touch to your site's typography? You're in the right place! This comprehensive guide will walk you through the process of adding custom fonts to WordPress, from start to finish.
Whether you're a beginner just starting out with WordPress or an intermediate user looking to expand your skills, this guide has got you covered. We'll explore different methods, share practical examples, and provide actionable tips to help you customize your site's typography like a pro.
Why Add Custom Fonts to WordPress?
Before we dive into the how-to, let's quickly discuss why you might want to add custom fonts to your WordPress site:
- Brand Identity: Custom fonts can help reinforce your brand's unique personality and style.
- Improved Readability: The right font can make your content easier to read and more engaging.
- Stand Out from the Crowd: Custom typography sets your site apart from others using standard fonts.
- Consistency: Using custom fonts ensures consistency across your website and other marketing materials.
Now that we understand the benefits, let's explore how to add custom fonts to WordPress.
How to Add Custom Fonts to WordPress

Method 1: Using a Plugin to Add Custom Fonts
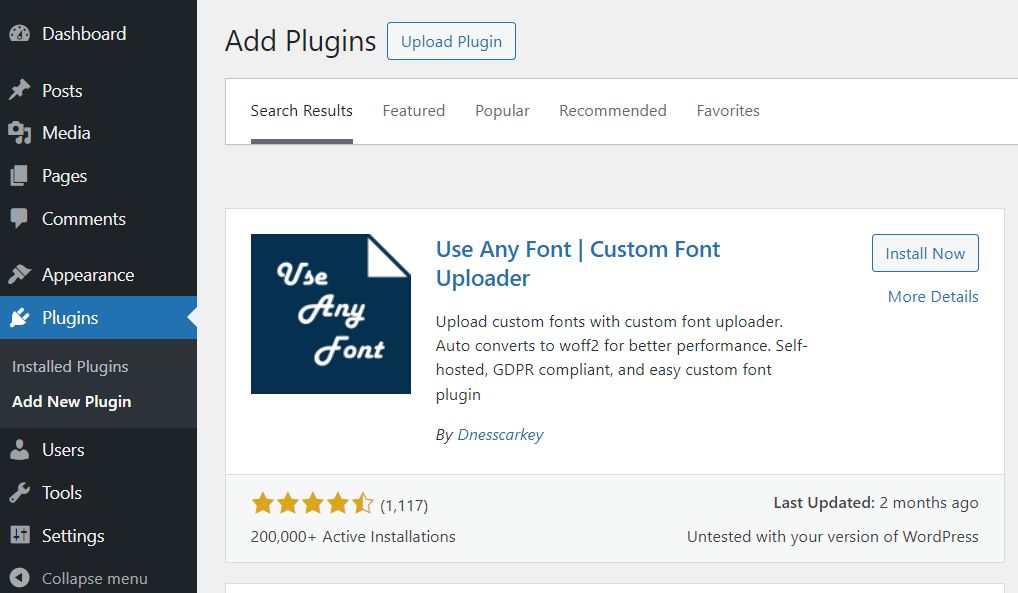
For beginners, using a plugin is the easiest way to add custom fonts to WordPress. We'll use the popular Use Any Font plugin for this example.
Key Features of Use Any Font Plugin
Easy Font Upload: Supports ttf, otf, woff, and woff2 font formats. Only one format needs to be uploaded; others are auto-converted.
Fast Font Loading: Automatically converts fonts to compressed woff2 format for 30% faster loading.
SEO Friendly & GDPR Compliant: Fonts are embedded with @font-face CSS and stored on your server.
Large Font Upload: Allows uploads up to 25 MB.
Font Variations: Upload multiple styles and weights of the same font.
Wide Compatibility: Works with popular page builders and themes like Divi, Elementor, Beaver Builder, and more.
Language Support: Assign fonts based on language with WPML and Polylang plugins.
Font Display Property: Manage font loading behavior in @font-face.
Predefined Fonts: Access to 23,871+ predefined fonts available for both free and commercial use.
By using the Use Any Font plugin, you can easily add custom fonts to your WordPress site without needing to edit any code. The plugin's features make it a powerful and user-friendly solution for customizing your site's typography.
Step 1: Install and Activate the Plugin
- Log in to your WordPress dashboard.
- Go to Plugins > Add New.
- Search for "Use Any Font".
- Click "Install Now" and then "Activate".

Step 2: Upload Your Custom Font
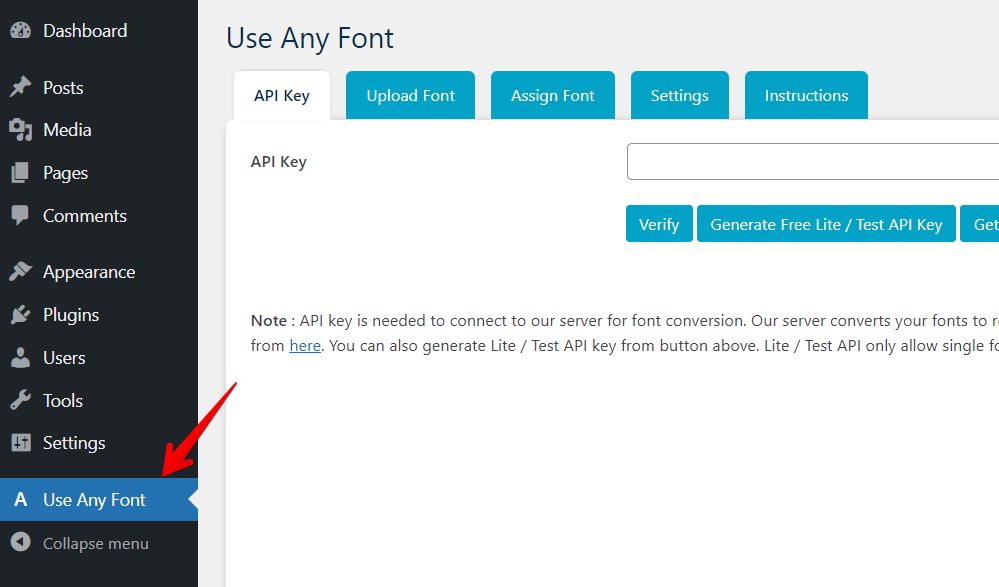
- Click "Use Any Fonts" menu.
- You must generate API key first. Click "Generate Free Lite API Key" .
- Click on "Upload Fonts".
- Upload your font file (in .woff or .woff2 format for best compatibility).
- Give your font a name and click "Upload".

Step 3: Assign the Font to Elements
- Click "Assign Font"
- In the plugin settings, you'll see a list of elements (like body text, headings, etc.).
- Select your uploaded font from the dropdown menu for each element you want to change.
- Click "Save Settings".
And that's it! Your custom font is now live on your WordPress site.
Method 2: Manually Adding Custom Fonts to WordPress
For intermediate users or those who prefer more control, you can manually add custom fonts to WordPress. This method involves editing your theme's files, so make sure to back up your site before proceeding.
Step 1: Upload Your Font Files
- Convert your font to web-friendly formats (.woff and .woff2) using a tool like Font Squirrel.
- Upload the font files to your theme folder
(wp-content/themes/your-theme-name/fonts/).
Step 2: Add @font-face Rule to Your Stylesheet
- Open your theme's
style.cssfile. - Add the following code, replacing the file paths and font names with your own:
@font-face {
  font-family: 'YourFontName';
  src:
    url('fonts/your-font.woff2') format('woff2'),
    url('fonts/your-font.woff') format('woff');
  font-weight: normal;
  font-style: normal;
}
Step 3: Use the Font in Your CSS
Now you can use your custom font anywhere in your CSS like this:
body {
  font-family: 'YourFontName', sans-serif;
}
Method 3: Using Google Fonts
Google Fonts offers a vast library of free, web-optimized fonts that are easy to integrate into WordPress.
Step 1: Choose Your Google Font
- Visit Google Fonts.
- Select the font you want to use.
- Click the "Get Font" button to add it to your selection.

Step 2: Get the Embed Code
- Click on the "Embed Code" button.
- Copy the provided
<link>code.
For example:
<link rel="preconnect" href="https://fonts.googleapis.com" />
<link rel="preconnect" href="https://fonts.gstatic.com" crossorigin />
<link
  href="https://fonts.googleapis.com/css2?family=Roboto:ital,wght@0,100;0,300;0,400;0,500;0,700;0,900;1,100;1,300;1,400;1,500;1,700;1,900&display=swap"
  rel="stylesheet"
/>
Step 3: Add the Font to WordPress
- Go to your WordPress dashboard.
- Navigate to Appearance > Theme Editor.
- Find the
header.phpfile in your theme files. - Paste the
<link>code just before the closing</head>tag. - Click "Update File".
Step 4: Use the Font in Your CSS
Now you can use the Google Font in your style.css like this:
body {
  font-family: 'Font Name', sans-serif;
}
Replace 'Font Name' with the actual name of your chosen Google Font.
Best Practices for Using Custom Fonts
- Limit the number of fonts: Use no more than 2-3 different fonts on your site to maintain a clean, cohesive look.
- Consider loading times: Custom fonts can slow down your site, so use them judiciously.
- Ensure readability: Choose fonts that are easy to read, especially for body text.
- Test on multiple devices: Make sure your custom fonts look good on desktop, tablet, and mobile.
- Provide fallback fonts: Always include web-safe fallback fonts in case your custom font fails to load. For example
sans-serifforRobotoorserifforLora.
Troubleshooting Common Issues
- Font not displaying: Make sure the file paths in your CSS are correct.
- Slow loading times: Optimize your font files and consider using a CDN.
- Inconsistent display across browsers: Use multiple font formats (.woff2, .woff) for better compatibility.
- Font looks different than expected: Check if you're using the correct font weight and style.
Conclusion
Adding custom fonts to WordPress is a great way to enhance your site's visual appeal and reinforce your brand identity. Whether you choose to use a plugin, manually add fonts, or integrate Google Fonts, you now have the knowledge to customize your WordPress typography like a pro.
Remember to always prioritize readability and site performance when choosing and implementing custom fonts. With these tips and techniques, you're well on your way to creating a unique and engaging WordPress site that stands out from the crowd.
Happy font customizing!